Ubuntu Firewall (UFW)
The Linux Kernel features the Netfilter subsystem, meant to aid with establishing the network traffic that goes in or through your server. This Kernel packet filtering system cannot be used without iptables.
Mainly, when a packet arrives on your server, it is redirected to the Netfilter subsystem for approval, handling, or rejection depending on the rules offered by userspace via iptables.
UFW makes this much easier. So how use this firewall?
What is UFW?
UFW stands for Uncomplicated Firewall, an app created for managing iptables on the Ubuntu firewall.
UFW is the basic firewall configuration mechanism for Ubuntu Linux, which is why it comes with a simple, user-friendly approach for configuration purposes of the Firewall.
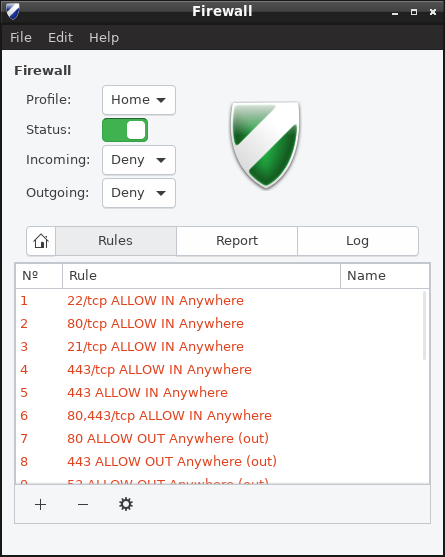
The UFW Firewall for Ubuntu supports both IPv4 and IPv6. Besides, UFW allows you to use a GUI application (named gufw), for the case in which you use a GNOME desktop or a KDE desktop.
How to install UFW on Ubuntu?
Before starting the actual installation process of UFW on Ubuntu, you will have to undergo a pre-flight check. As soon as the run package updates process is done, you can safely proceed to the installation of UFW. The process is a simple two-step approach:
Install UFW via command
apt install ufwCheck the install via command
ufw --versionTo see if it’s running, this command
sudo ufw statusKeep in mind that at this stage, there not much to set up, as no enable or restart with the system is doable since UFW is meant for managing purposes of iptables or netfilters.
Not running? To enable UFW, you will have to run the command
sudo ufw enableIt will output
Firewall is active and enabled on system startupKeep in mind that if you are in a migration process from an iptables based setup, you will have to redesign the commands in UFW.
Configure Firewall
Now that it’s installed, how can you configure it?
To open a port, for example SSH 22:
sudo ufw allow 22To close an opened port:
sudo ufw deny 22To show all the rules:
sudo ufw statusTo have the best results with Ubuntu Firewall, it is necessary to set up the basic rules first, enable them, and afterward enable UFW. In this way, you don’t risk getting locked out while working over SSH.
Setup a Firewall with UFW on an Ubuntu and Debian
You can use these commands to configure your firewall in Ubuntu Linux and Debian Linux.
First install the program:
sudo apt-get install ufw
sudo ufw status
Block everything:
sudo ufw default deny incoming
sudo ufw default deny outgoing
And only allow what you need (ssh, web, ftp, dns)
sudo ufw allow ssh
sudo ufw allow 22/tcp
sudo ufw allow www
sudo ufw allow 80/tcp
sudo ufw allow ftp
sudo ufw allow 21/tcp
sudo ufw allow dns
sudo ufw allow 53/tcp
sudo ufw allow 53/udp
Turn on ufw
sudo ufw enableWhat are the advanced UFW settings?
Of course, as it is the case with any type of Firewall, you are allowed to activate several advanced UFW commands. These include:
Enable a port range – UFW permits administrators to set up a range of specific ports in UFW. Specific services need FTP or IRC, which makes use of several ports to communicate with clients.
Enable a specific IP address – UFW is excellent for allowing specific IPs to access all services. All you have to do is add the
fromoption.sudo ufw allow from 192.168.1.5
Enable subnet – on the other hand, if you aim to permit all IP addresses on your subnet, you can simply access the command meant to ad IP subnet to the UFW similar to: `ufw allow from (type IP address).
Redirect incoming traffic to a designated port – if you aim to allow all incoming traffic to a specific port, the command
ufw allow to any portmust be followed by port number.Disable – if you aim to turn off UFW and keep your rules in place temporarily, you will have to use the command
sudo ufw disable
Reset UFW - On the other hand, if you want to turn off UFW entirely and remove all the rules, you will have to use the command
sudo ufw reset